Pen tool -
Using the pen tool and layer masks to cut out pieces of images a is really simple task which doesn't require much effort. But for this task, we're going to need an image in which we want to take something or someone out of.
Using the pen tool and layer masks to cut out pieces of images a is really simple task which doesn't require much effort. But for this task, we're going to need an image in which we want to take something or someone out of.
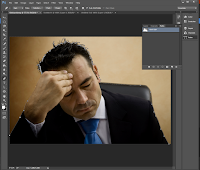
So with that said, here is my image i wish to use the pen tool with:
Apart from looking obviously stressed out and like he's trying to think happy thoughts, he is also behind a background which doesn't allow us to either create a good vector out of him or a png with a transparent background. To fix this we must take to photoshop and remove it whilst also keeping his seat and hair in the picture.
Now, we could easily use the magic wand tool for this but that's not always the best thing to do. The magic wand tool bases what it selects off of colour and though in this instance would be okay to use for the sake of demonstration i will take you over how to use your pen tool on photoshop.
Something to know beforehand -
- Anchor points - points you have made by clicking onto the canvas with the pen tool selected.
In order to start using the pen tool, you must first locate it of course. The pen tool is allocated on the left side where every other tool is, for instance, the type tool.
Here is an image of the pen tool so you know what to click on.
 Now it's time to place our first anchor point, this is where our cutting out process will start, with the pen tool click and start at a place which feels and looks right to you. I have chosen mine to be at the start of the mans suit on the right-hand side.
Below is an image of the second to creating a path around your entire image you want to cut out. In order to achieve bent and curved lines, clicking and holding allows you to curve your path to your liking but can also create a problem i'll go over in the next step.
You may notice two lines coming off of the anchor point you place and curved, this is because it takes the angle at which you curved your path in order follow along that, but we don't want this so what we must do is hover the anchor point and click whilst you have Alt/Option held down/ This will delete your angle and allow you to freely bend and curve your path again. Now do this around your entire picture.

Here is my finished pathing all done from one side to the other, now all thats left to do is join the two end anchors together to crate a finished path. Once you've done this, open the paths tab and once you have your cursor hovered over the small box showing you your path, hold Ctrl and click, this will make your path into a selection. From here just simply copy and paste and you have your image cut out.
 |
| Final product, image has been cut out using the pen tool |


No comments:
Post a Comment